As promised on episode 50, here are the details of how I make my episodes. But before we begin, a few caveats.
- I am self-taught and am not an expert on anything. Use my suggestions and advice at your own risk.
- I’ve made some changes over time, so this is only a snapshot as of today.
Recording
I record in Squadcast.fm. What I like about them is that I get essentially what’s called a double-ender. The technology records locally in my machine and in the machine of my guest. So if there are any internet hiccups during recording, they don’t manifest in the audio files. They recently upped their audio quality to 48000 Hz, which is great. I always make it a point to use video while recording, I feel I get a better interview with it on. However, I don’t record or keep the video, just the audio.
When recording, I always record locally on both ends as well, if my guest can do so. If my guest can’t manage Squadcast, I will use Zoom instead, but it’s not as good for two reasons:
- Zoom audio is lesser quality than Squadcast. (32000 vs 48000) Learn more here.
- Zoom audio is records both audio tracks on my end. So if there is the slightest delay, anywhere in the internet, it shows up in the audio. Squadcast doesn’t have this problem due to a different architecture.
Backing Up
Once the recording is done, I ask the guest to immediately send me their file. Then I back up the 4 audio files: Squadcast for me and my guest, and our local recordings to three different locations.
- Cloud storage account
- Synology NAS (Local Mass Storage)
- Local Hard Drive backup of my main machine
The Synology and Local Hard Drive files are never touched until the episode launches.
Editing
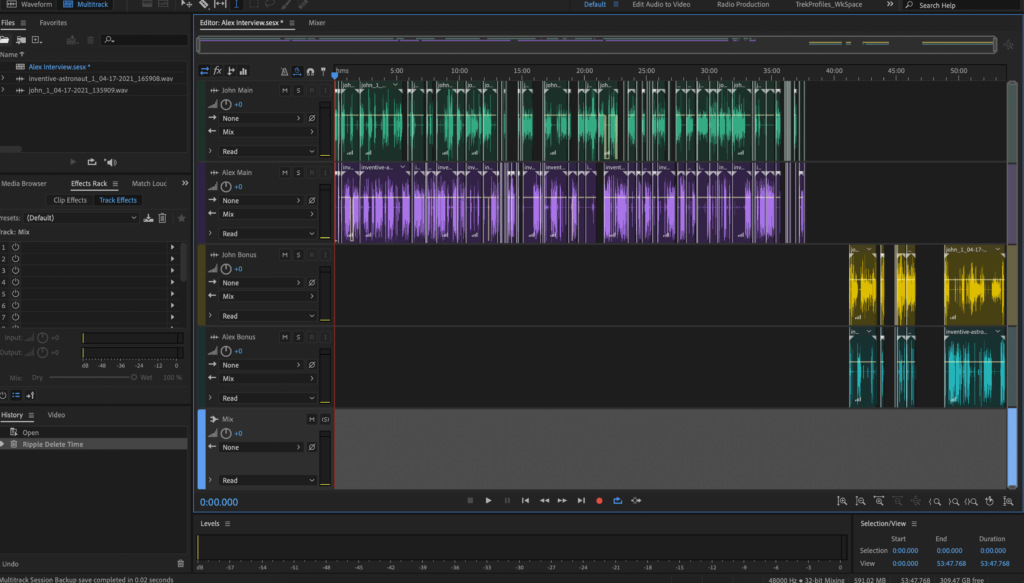
I edit using the files in the Cloud Drive. I use Adobe Audition for this. I initially start just with the interview itself. I decide which of the tracks I’ll use. Mostly I stick to the local recordings, but I have used the Squadcast ones occasionally. Note that all of my tracks are “mono” audio. Given the nature of my show stereo is just not needed and increases the file size.
- I open an empty multitrack in Adobe Audition with 4 tracks: Me, main and bonus and the Guest, main and bonus.
- The only destructive editing I do is a noise reduction pass on each of the raw tracks. This is with the built in Noise Reduction tool in Adobe. When recording, I always get 10 seconds of silence before recording and that’s the noise reference bit. I point Adobe to that silence and then have it “remove” that sound from the entire audio file.
- Then I go through the interview tracks and edit them. This is over 80% of the editing time.
- Reduce pauses
- Lower the volume or remove breath and mouth sounds
- Cut any production chat
- Cut or minimize mistakes
- Move bonus material to the bonus tracks
- Reduce or eliminate false starts, verbal connectors (ummmm, uhhhhhhh, etc…)
- Once editing on the interview itself it done, I export the 4 files (John Main, John Bonus, Guest Main, Guest Bonus) as separate files. Note that all of this is non-destructive. I still have the original audio and now the edited ones too.
- Next I write the M5 lines and create them in Adobe Audition using the Generate Speech option, then I pitch shift it down.
- Then comes the wrapper audio. I record all of my intro and outro script and do my solo recording for that.
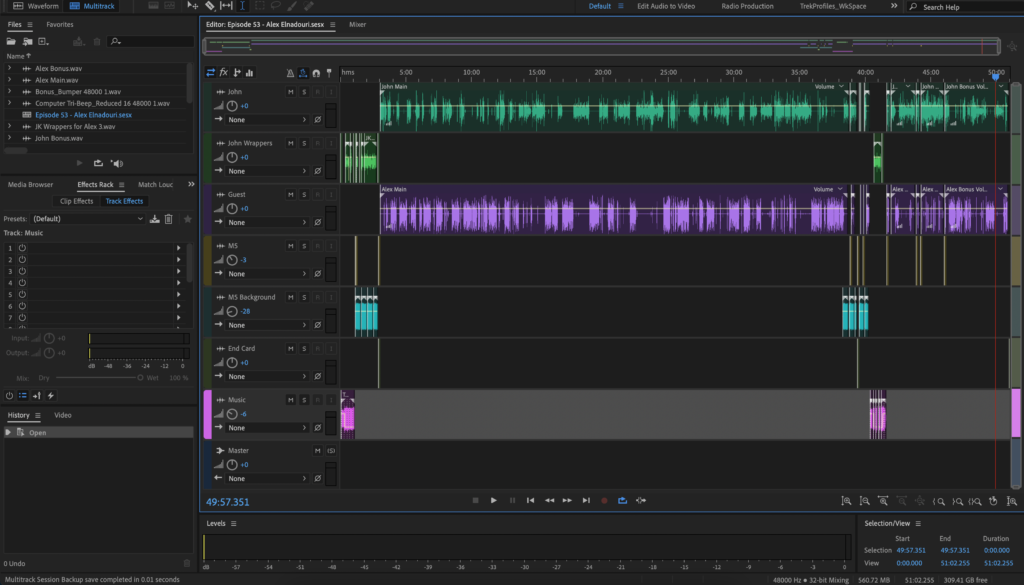
- Once I’ve got that done, I create the master multitrack. Each track has its own effects applied in the “Effects Rack” in Adobe.
- I use two tracks for me. One is for my main interview track and the other is for my wrapper audio. Since these were recorded at different times, they may require different handling.
- I also have a guest track
- The M5 has his own track
- The M5 background tones is a separate track
- I have a track that will have no adjustments done and that has the “computer tri-beeps” and the Sky and Stars ending card. These audio bits are already normalized and set at the proper volume and don’t need any additional processing.
- Music has its own track too
- Voice tracks get speech volume leveling, slight DeNoise adjustment, and Hard Limiting. All of this is in the effects rack. The other audio are mostly just volume adjustments.
- Then I export the entire thing as a gigantic uncompressed sound file
- Then I use the Match Loudness feature to set the giant audio file to -19 LUFS
- I use a bit of limiting in Adobe. Usually I start with Dynamics > Smooth Vocals and just do that. Rarely do I try anything else.
- Then I export the MP3 as 41000Hz at 16 bits, 96Kbps CBR
- Now I do a QA pass on the file. I listen for anything I missed, and I also do the show notes at the same time for the website.
- Episode art I do in Adobe Illustrator
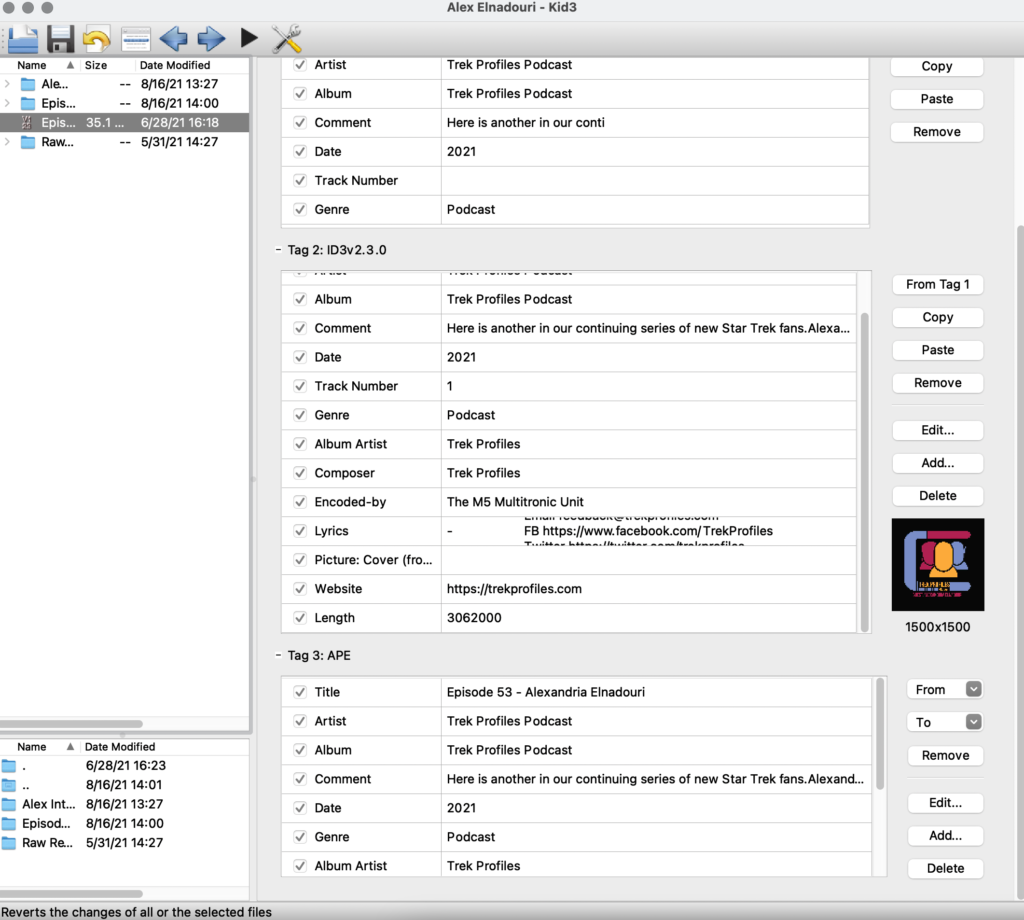
- Then I manually create ID3 tags in a tool called KID3 and add all the tags and episode art.
Assuming I discover no issues, I upload the file to Libsyn, post the show notes and off we go. Once each episode launches I make a ZIP file of the entire folder and archive that in long term storage.
Gear
- Audio Technica 2020 mic with XLR cables. I have a cheap stand for it that I bought at Guitar Center
- I have a cheap pop filter on the mic.
- I used to use a Behringer Xenyx 802 Mixer. The mic plugs into the mixer and the mixer would go into my computer. But now I have switched to a Focusrite Scarlett Solo for this. The mic goes into the Scarlett via XLR and then into my computer setup via a Thunderbolt Dock. I made this switch in the summer of 2021. Given the long production timeline of my show, it will take a while to appear in the interviews. But it will certainly show up in the wrappers first.
- I have an OWC Thunderbolt 3 dock where the Scarlett connects in.
- And I record on a 2018 Macbook Pro.
Software
- Adobe Audition for recording and editing
- Adobe Illustrator for the artwork
- Kid3 for mp3 tags
